

System Configurations
The SYS CONFIG option on the SETTINGS screen allows you to configure various system functions.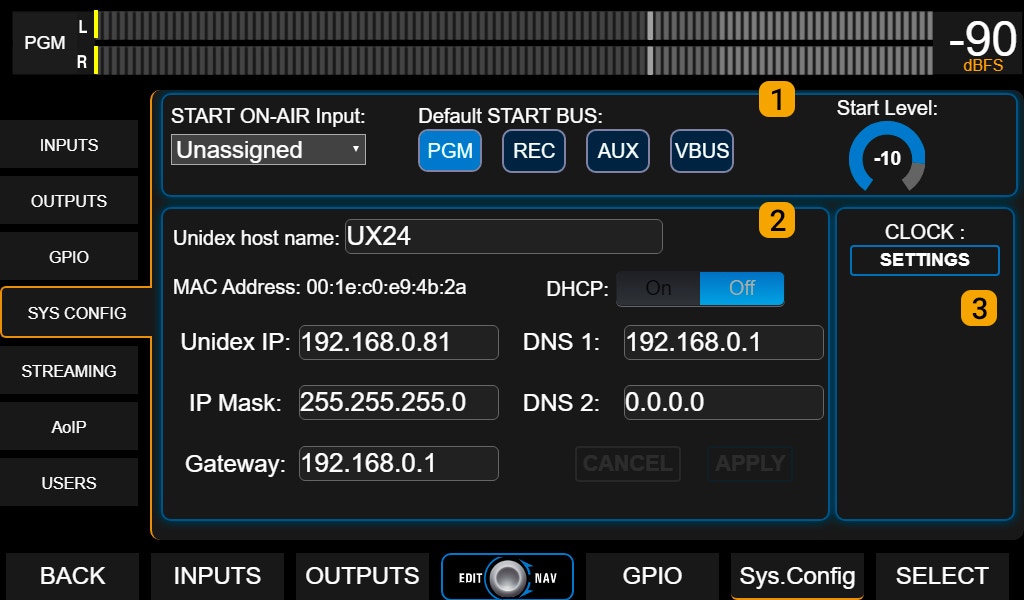
1 Start On-Air Input
Defines the input that will automatically be put on-air if the console restarts due to a power supply failure.For stereo inputs, either channel of the pair can be selected. The chosen input must be assigned to a hardware or virtual channel. The console always starts with the last used scene; therefore, if the station operates in automated mode, ensure that the selected scene has at least one channel assigned with the input defined for “automatic start”. The audio source connected to that input must also resume autonomously. Default Bus
Indicates the buses that will be activated on the channel assigned to the input defined in
Start on-air input.
LevelPreconfigured level, independent of the physical fader position. If the fader is moved, the level will change to the value corresponding to its current position.
2 Network Settings (Remote Access)
Configure the network connection for remote control via Ethernet Control.By default, the console operates in DHCP mode. The IP address assigned by the router is displayed on the main screen (the UNIDEX IP field in the STATUS section). Using this IP address, it is possible to access the console from any computer on the same LAN using a web browser.
UNIDEX incorporates an internal HTML5 server that provides the graphical interface for operating and configuring all its functions.
1 Clock Settings
Opens a window to adjust the time. The setting can be performed in three ways:- Automatic synchronization via STREAMING port
Connect the STREAMING Ethernet port to a LAN with Internet access. Synchronization is performed automatically against an international reference clock (UTC), without user intervention. - Automatic synchronization via CONTROL port
Connect the CONTROL Ethernet port to a LAN with Internet access. This synchronizes the console’s internal clock (UX-Core). Then, manually synchronize the control computer (touchscreen) by pressing the SYNC FROM UX-CORE option. - Manual adjustment
Enter the time manually in cases where there is no Internet access.
Define the corresponding time zone in the
Time Zone field.
Users and Access Levels
They are accessed from the SETTINGS screen, under the USERS option.UNIDEX has several user levels with predefined restrictions:
- ADMIN
- EXPERT
- BASIC
- GUEST (only in UX24)
How to Start with Restricted Access
TheDEFAULT USER option defines the user that is loaded when the console is powered on.The default user is ADMIN, and during startup, the system never requests a password. To restrict access to advanced functions, it is recommended to change the default user (ADMIN) to BASIC or EXPERT, depending on the desired restriction level.
- If the console starts with the BASIC level, the operator will need to enter the EXPERT or ADMIN password to access restricted functions.
- If it starts with the EXPERT level, only functions requiring the ADMIN level are locked.