

- Changing the active user.
- Changing the current scene.
- Using advanced functions to organize channels.
USERS
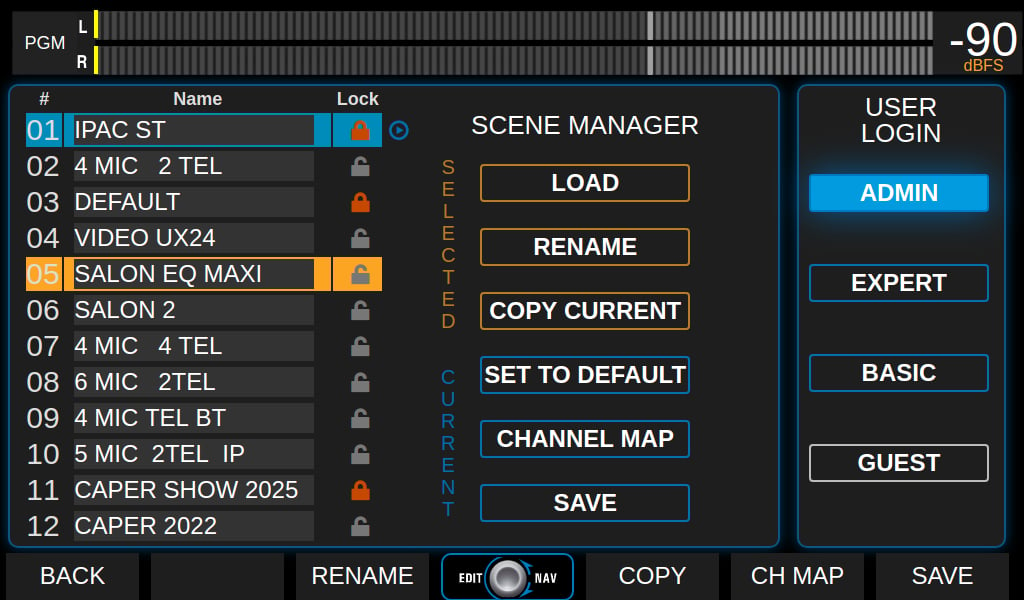
The USER LOGIN area displays the currently active user, highlighted in blue, and allows switching to another user by tapping the name.There are four user levels with different preset permissions. Restrictions apply both for onboard screen access and the remote web interface.
GUEST User
Highly restricted profile. No password protection.- Can only operate essential functions: physical faders, CUE, monitor assignment, TELCO, and bus assignment.
- Cannot change scenes. Cannot access virtual channels.
BASIC User
Restricted profile:- Password protected (default:
basic). Only ADMIN user can change it. - No access to advanced configuration settings (SETTINGS).
- Can switch scenes but cannot save changes or create new scenes.
- Can view processor settings and status but cannot modify them or turn them on/off.
- Can temporarily modify basic channel options (GAIN, NAME, PAN, CHANNEL ACTIONS) but cannot save changes to the scene.
EXPERT User
Profile with intermediate restrictions:- Password protected (default:
expert). Only the ADMIN user can change it. - Same as BASIC, without access to advanced configuration (SETTINGS).
- Full access to audio processes.
- On the CHANNEL screen, can change gain, pan, name, input assignment, and channel mode, but without access to SETTINGS.
- Can save the current scene, except if it is protected.
- Can create new scenes, even from a protected one.
ADMIN User
Profile with full access:- Password protected (default:
admin). - Can modify passwords for all profiles.
- Can create protected or read-only scenes, which are operational for BASIC and EXPERT but only editable by ADMIN.
STARTUP USERWhen powered on, the console starts with a predefined user profile (factory default: ADMIN) and never prompts for a password. To ensure access restriction from startup, change the startup user to BASIC or EXPERT.In
SETTINGS → USERS you can:- Change the startup user.
- Change passwords for ADMIN, EXPERT, and BASIC.
SCENES
A scene stores the entire console configuration, except for system settings (network, streaming, startup user, etc.). It includes:- Input and output configuration.
- Channel and bus assignments.
- Gain settings.
- Audio processor adjustments.
Available Scenes
The list displays 12 user scenes.- Navigation is done by rotating the encoder and confirmed by pressing it.
- The active scene is highlighted in cyan.
- The selected scene (but not confirmed) is highlighted in orange.
Protected Scenes (Lock)
- Only the ADMIN profile can create them.
- They are identified by a lock icon.
- BASIC and EXPERT users can load them but cannot modify or delete them.
Scene Manager
Displays two groups of options: for the selected scene and for the active scene. LOAD: Loads the selected scene. Can be executed via touchscreen, context button, or encoder.- Requires confirmation (cancels after 8 seconds if not confirmed).
- All profiles can load any scene.
- If channels are on-air, they remain active even if their position changes, maintaining their bus assignments.
- If the newly assigned channel has a different fader level, the previous digital level is maintained and indicated by blinking OLED.
- Audio cuts if the previously on-air input isn’t assigned to a channel in the new scene.
- Scene changes are blocked with an active or held TELCO line.
- Disabled for BASIC.
- Requires confirmation.
- Disabled for BASIC.
- Disabled for BASIC.
- Input assignments to all 24 channels.
- Signal routing to outputs.
- Specific input/output settings (phantom, MIX-MINUS modes, etc.).
- Input and output gains.
- Channel labels and actions.
- Audio processor settings.
- Assignment states, including VBUS.
Factory Scenes
Any of the 12 scenes can be reset to a default configuration. Additionally, UNIDEX comes from the factory with scenes designed with different configurations and UDX expansions, intended to serve as the foundation or example for creating new configurations.Download infographic about the default scene configuration (PDF)
Export and Import Scenes
Scenes can be exported and imported from the WEB control interface.From the scene management option in the web control, it’s possible to export each scene as a file on disk. They can then be imported into any of the 12 available positions.
Channel Map
The CHANNEL MAP function displays the configuration of all channels and allows easy reordering.There are two operating modes: SWAP 2 CH (swap two channels) and ORDER CH (rearrange channels).
SWAP 2 CH (Swap Two Channels)
Allows swapping the position of two channels.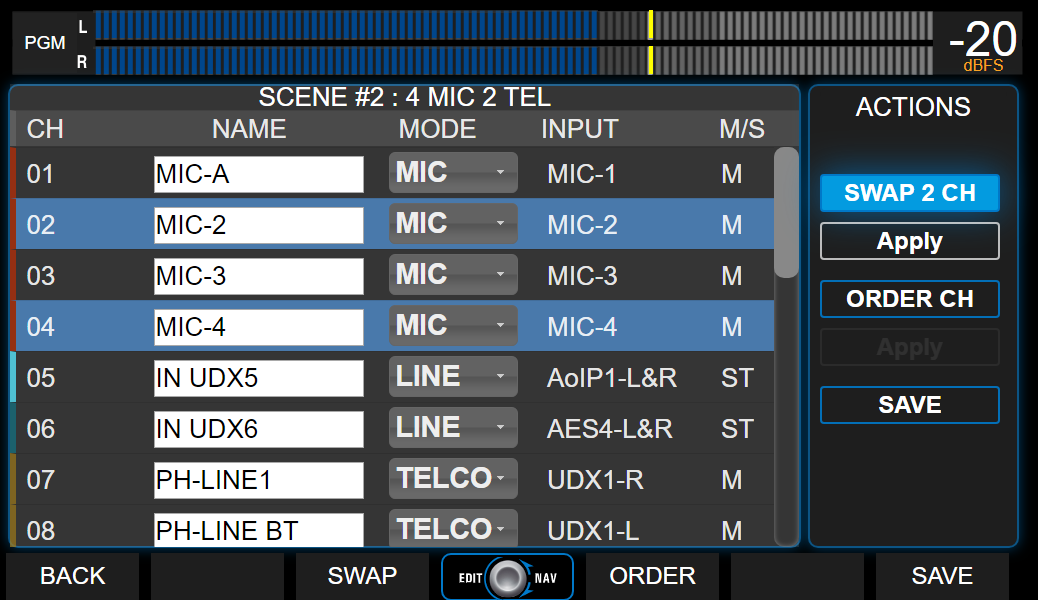
- Press SWAP 2 CH to enable the option.
- Select the two channels you wish to swap from the list.
- Press APPLY to execute the swap.
- Press SAVE to save the changes to the current scene.
ORDER CH (Reorder Channels)
Allows assigning new positions to one or more channels.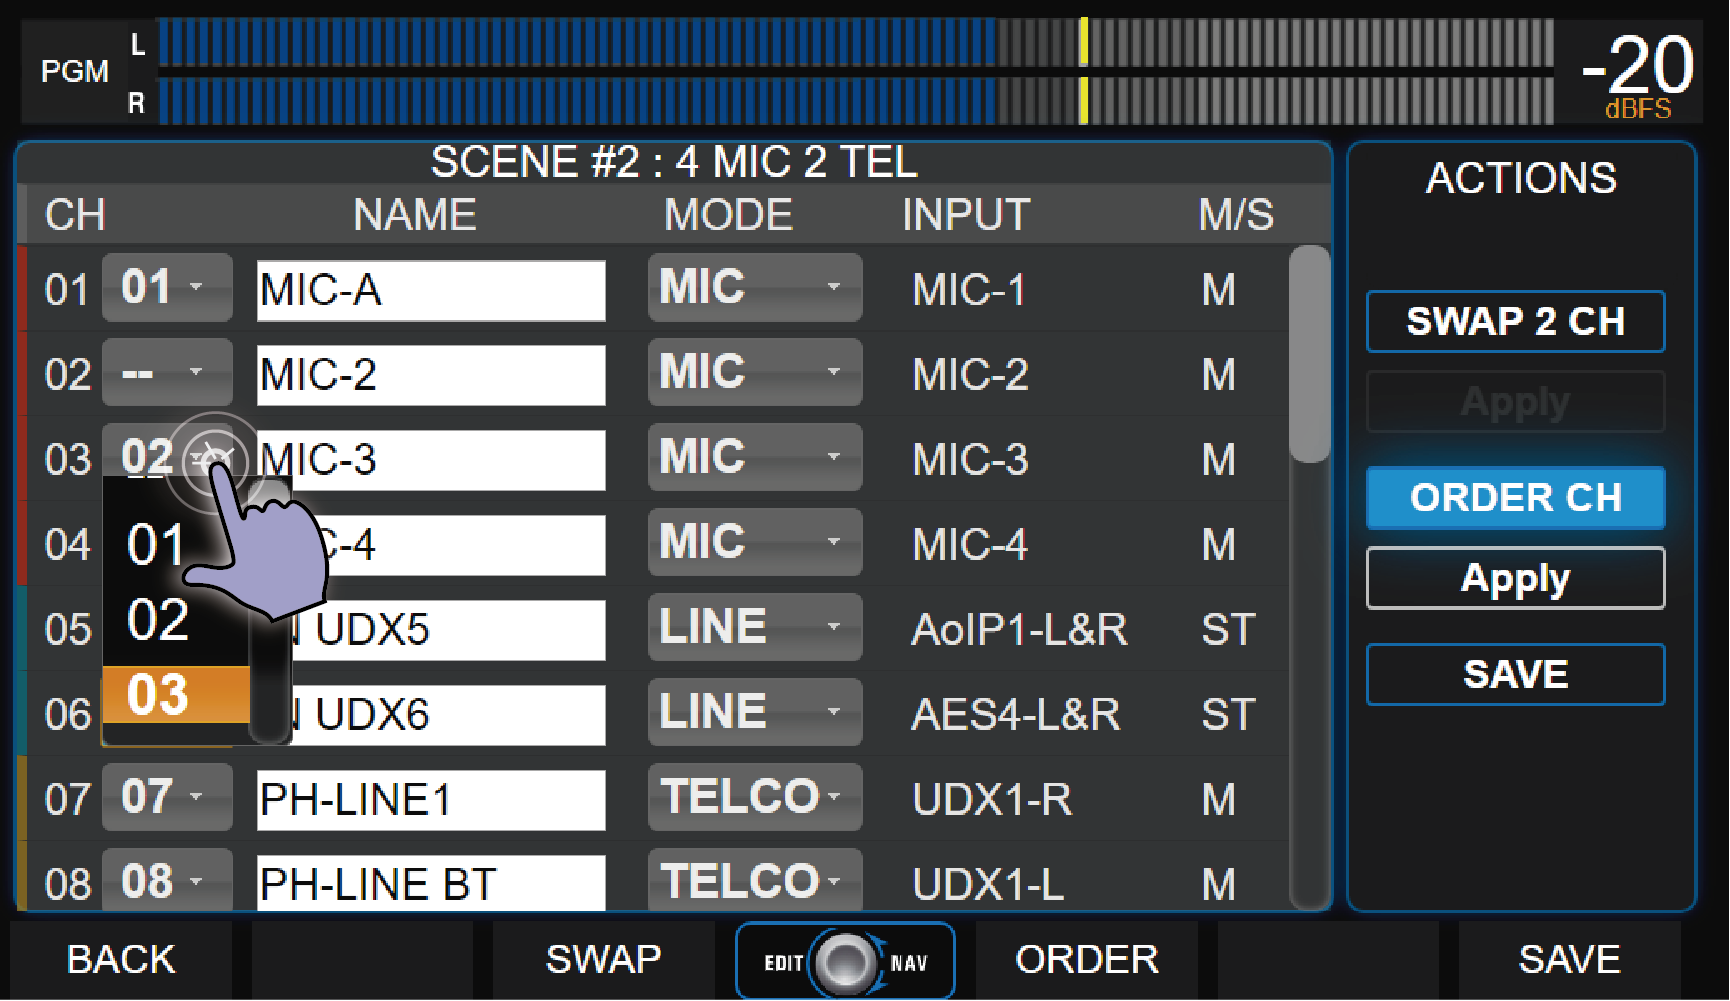
- Press ORDER CH.
A dropdown menu will appear to the right of the channel number, allowing assignment of a new position. - Touch the on-screen menu and select the new position for the channel.
Multiple channels can be repositioned simultaneously.
- Press APPLY to confirm.
- APPLY temporarily applies changes (not yet saved).
- If the scene is exited without saving, changes will be lost.
- Press SAVE to make changes permanent in the scene.
- To cancel, deactivate ORDER CH by touching the option again or pressing the contextual BACK button.